When brisk winter winds sweep through December nights, nothing brings heart-warming cheer to a holiday tablescape quite like a frosty friend bundled up for the season, and this Christmas Snowman in Blue Reindeer Earmuffs is destined to melt every heart. Standing at a charming 13 cm (5.1 inches) tall, this heirloom amigurumi pairs a seamless sculpted body and rosy plump cheeks with whimsical branched reindeer-antler earmuffs, cozy dark brown twig limbs, sky-blue mittens, and embroidered snowflake boots. Complete with a vibrant crimson winter scarf and a matching plush-cuffed holiday mitten gift pouch, this enchanting pattern delivers joyful festive magic in every stitch.
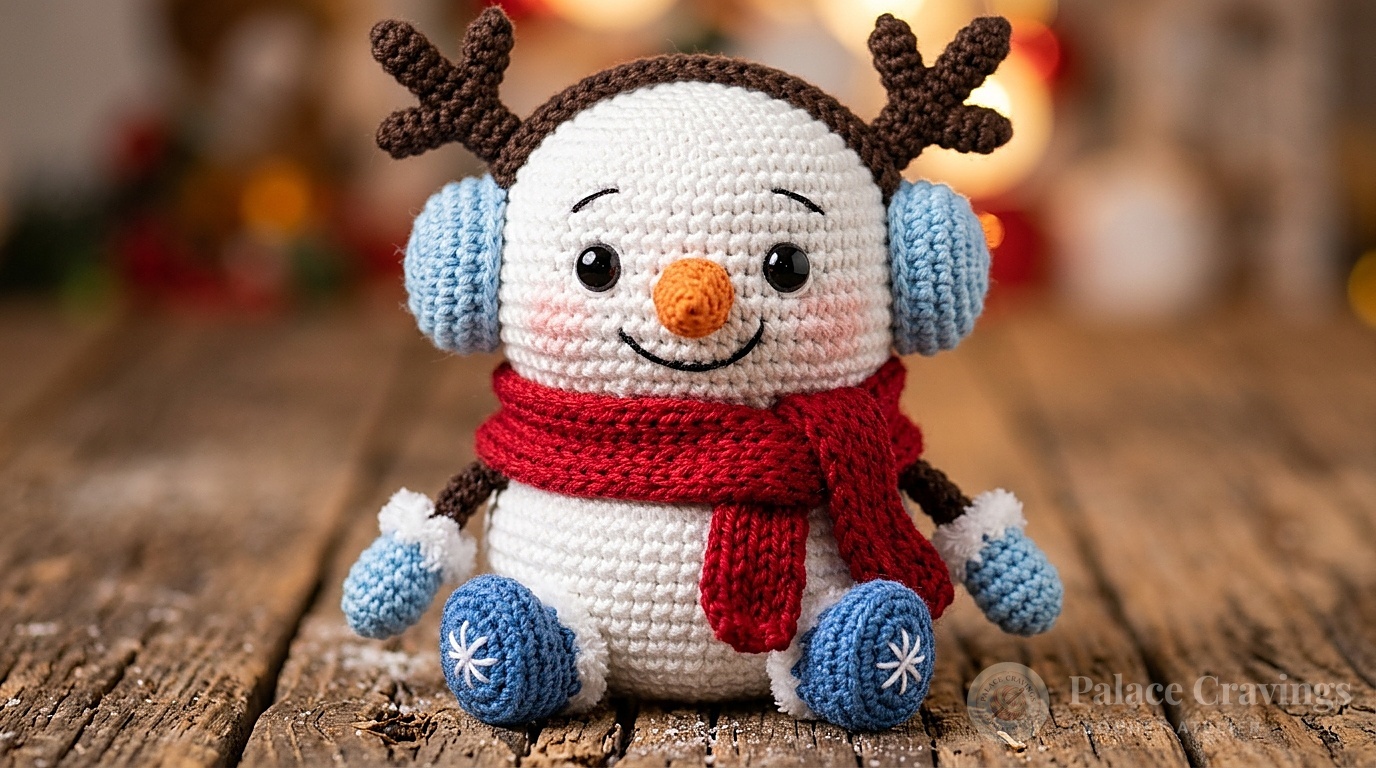
What sets this holiday snowman apart from traditional amigurumi is its couture anatomical sculpting and delightful character storytelling. Rather than standard cylindrical decreases, the head incorporates concentrated cheek increases and internal needle sculpting points that indent the 8 mm safety eyes and lift the smile naturally. Perked atop his crown is an artisan double-layered dark brown headband carrying two-tone sky-blue and chestnut ear cups, crowned with miniature branched reindeer horns that make him look ready to lead Santa’s sleigh!
Why You’ll Fall in Love with This Holiday Pattern
- Expressive Facial Needle Sculpting: Simple post-crochet internal thread tension sculpts deep dimensional eye sockets and plump rounded cheeks without complex shaping rounds.
- Seamless Neck-Down Construction: The head flows uninterrupted into the body in continuous spirals, creating a stable, sturdy foundation that never wobbles or requires separate neck seaming.
- Miniature Accessory Storytelling: From the 4-dc bobble thumb mittens to branched reindeer antlers and embroidered snowflake boots, every detail adds rich festive charm.
- Bonus Holiday Mitten Gift Pouch: Includes complete instructions for an heirloom gift pouch featuring a cloud-soft plush fleece cuff, ideal for gift cards, festive sweets, or holiday tree display.
Key Materials, Notions & Color Palette

- Sport-Weight Cotton Blend Yarn (e.g. YarnArt Jeans / 55% Cotton, 45% Acrylic, 50g/160m):
- Color A (Snow White): ~1 skein (50g) for seamless sculpted head and round snowball body.
- Color B (Sky Blue): ~25 yards for outer earmuff cups, mittens, and boots.
- Color C (Dark Chestnut Brown): ~20 yards for inner earmuff cups, double headband, branched antlers, and twig limbs.
- Color D (Festive Crimson Red): ~30 yards for long fringed neck scarf (and bonus mitten pouch base).
- Color E (Carrot Orange): ~5 yards for miniature ribbed carrot nose.
- Color F (Black Embroidery Floss): ~2 yards for curved cheek smile and delicate arched eyebrows.
- Plush Yarn for Mitten Cuff: ~15 yards of fluffy white fleece yarn (e.g. Alize Softy Plus or Himalaya Dolphin Baby).
- Crochet Hooks: 1.5 mm (US Steel 8) for the tight-gauge snowman amigurumi; 3.5 mm (US E/4) for the fluffy plush mitten cuff.
- Notions & Tools: Two 8 mm black plastic safety eyes with lock washers, premium cluster polyester fiberfill, dry cosmetic pink blush with blending brush, bent-tip tapestry needle, and precision stork scissors.
Curated Atelier Essentials: Crafting fine amigurumi with a 1.5 mm steel hook requires precision-ground tips and comfortable elastomer grips to maintain micro-tension without cramping hands:
Ergonomic Fine Steel Crochet Hook Set with Cushioned Comfort Grips
Precision-polished micro steel throats glide cleanly through sport cotton fibers without splitting strands, while contoured ergonomic elastomer handles ensure effortless control when crocheting miniature reindeer antlers and sculpted snowmen.
Step-by-Step Construction Walkthrough
Part 1: Miniature Carrot Nose & Sculpted Head: Work the cone-shaped carrot nose in vibrant orange across 6 rounds. Moving to Snow White with your 1.5 mm hook, build the head sphere through Round 12. At Round 13, work concentrated cheek increases: (1 sc, inc) × 12, 18 sc (54 sts) to form prominent cheek contours. Place 8 mm black safety eyes centered 4 stitches apart between Rounds 11 and 12, directly above the cheek shelf, then decrease through Round 27 while stuffing firmly.
Part 2: 6-Point Facial Needle Sculpting: Using a long needle and strong white thread, pass from Points 1 & 2 under the chin up through Points 3 & 5 at the left eye corners, and Points 4 & 6 at the right eye corners. Pull firmly with steady tension to sink the eye sockets inward and lift the cheek contours outward into a sweet, expressive smile. Sew the stuffed carrot nose centered between the eyes, and embroider curved eyebrows and a cheeky side smile with black thread!

Part 3: Seamless Body Expansion & Snowflake Limbs: Continue uninterrupted from Round 27 into the body, gradually increasing to 48 stitches to form a round, plump snowball base. For the boots and mittens, crochet sky-blue cups, execute a 4-dc bobble stitch for each mitten thumb, and transition into dark brown twig arms and legs through Back Loops Only (BLO). Work delicate white single crochet cuffs into the remaining front loops and embroider crisp 6-point white snowflakes across the blue boots and mittens!
Part 4: Reindeer Antler Earmuffs & Winter Scarf: Crochet two sky-blue outer cups and two dark chestnut inner cups, joining them back-to-back with single crochet for a thick, plush feel. Connect them with a sturdy double-layered dark brown headband. For each antler, join a 3-round tip to a 4-round main branch in continuous rounds, then sew atop each earmuff cup. Mount securely to the snowman’s head, tie a 96-chain crimson red scarf with fringed edges around his neck, and softly brush his cheeks with dry pink pastel!
3 Master Techniques for Flawless Character Finishing
1. Controlled Needle Sculpting Tension: Tie a secure surgeon’s knot under the snowman’s chin while pulling the sculpting thread tight. Check that both eye sockets indent symmetrically before securing the knot with a dab of fabric glue and hiding the tails inside the neck cavity.
2. Micro Antler Wire Armature (Optional): If you prefer reindeer antlers that hold dynamic poses, insert a 2-inch piece of flexible craft wire wrapped in brown floral tape into each main antler branch before sewing to the earmuffs.
3. Pastel Blushing Application: Scrape a small amount of pink dry pastel powder onto scrap paper, dip a soft eyeshadow blending brush, and tap off excess pigment. Swirl gently in light circular motions onto the sculpted cheeks to create a soft, natural cold-weather glow.
Holiday Mantel Styling & Festive Vignettes

- Nordic Woodland Hearth Display: Perch the snowman on a slice of natural birch wood alongside frosted pinecones, cinnamon bundles, and miniature ceramic Christmas cottages.
- Christmas Tree Branch Ornament: Loop a 6-inch metallic silver thread through the center of the dark brown earmuff headband to suspend this charming snowman from cedar evergreen branches.
- Keepsake Gift Presentation: Tuck a holiday gift card, rolled handwritten note, or artisan peppermint bark inside the companion plush-cuffed holiday mitten pouch for an unforgettable handmade present.
Complete Written Pattern (Standard US Terms)
Abbreviations (US Terms): mr = magic ring; ch = chain; sc = single crochet; sl st = slip stitch; dc = double crochet; 4-dc bobble = 4 incomplete dc worked into same stitch and joined at top; inc = single crochet increase (2 sc in same st); dec = invisible single crochet decrease (sc2tog); BLO = back loop only; FLO = front loop only; FO = fasten off.
Part 1: Carrot Nose & Sculpted Head (1.5 mm Hook)
Carrot Nose (Carrot Orange):
• Rnd 1: 4 sc in mr (4).
• Rnd 2: [1 sc, inc] × 2 (6).
• Rnd 3: 6 sc around (6).
• Rnd 4: [1 sc, inc] × 3 (9).
• Rnds 5–6: 9 sc around (2 rnds). FO leaving a 10-inch sewing tail.
Snowman Head (Snow White):
• Rnd 1: 6 sc in mr (6).
• Rnd 2: 6 inc (12).
• Rnd 3: [1 sc, inc] × 6 (18).
• Rnd 4: 1 sc, inc, [2 sc, inc] × 5, 1 sc (24).
• Rnd 5: [3 sc, inc] × 6 (30).
• Rnd 6: 2 sc, inc, [4 sc, inc] × 5, 2 sc (36).
• Rnd 7: [5 sc, inc] × 6 (42).
• Rnds 8–12: 42 sc around (5 rnds).
• Rnd 13 (Cheek Shelf): [1 sc, inc] × 12, 18 sc (54).
• Rnds 14–18: 54 sc around (5 rnds).
• Rnd 19: [7 sc, dec] × 6 (48). Insert 8 mm safety eyes centered above cheek shelf between Rnds 11 & 12 spaced 4 sc apart.
• Rnd 20: 48 sc around (48).
• Rnd 21: 3 sc, dec, [6 sc, dec] × 5, 3 sc (42).
• Rnd 22: [5 sc, dec] × 6 (36).
• Rnd 23: 2 sc, dec, [4 sc, dec] × 5, 2 sc (30).
• Rnd 24: [3 sc, dec] × 6 (24).
• Rnd 25: 1 sc, dec, [2 sc, dec] × 5, 1 sc (18).
• Rnd 26: 18 sc around (18).
• Rnd 27: [2 sc, inc] × 6 (24). Stuff head firmly, shaping cheeks with extra stuffing!
Part 2: Seamless Snowball Body (Snow White)
Continue working in continuous spiral rounds from neck Round 27:
• Rnd 28: 24 sc around (24).
• Rnd 29: [3 sc, inc] × 6 (30).
• Rnd 30: [4 sc, inc] × 6 (36).
• Rnd 31: 36 sc around (36).
• Rnd 32: [5 sc, inc] × 6 (42).
• Rnds 33–36: 42 sc around (4 rnds even).
• Rnd 37: [6 sc, inc] × 6 (48).
• Rnds 38–41: 48 sc around (4 rnds even).
• Rnd 42: 3 sc, dec, [6 sc, dec] × 5, 3 sc (42).
• Rnd 43: [5 sc, dec] × 6 (36).
• Rnd 44: 2 sc, dec, [4 sc, dec] × 5, 2 sc (30).
• Rnd 45: [3 sc, dec] × 6 (24). Stuff neck and body firmly.
• Rnd 46: 1 sc, dec, [2 sc, dec] × 5, 1 sc (18).
• Rnd 47: [1 sc, dec] × 6 (12).
• Rnd 48: 6 dec (6). Pull opening tightly closed, fasten off, and weave in tail.
Part 3: Snowflake Boots & Mittens (Make 2 Each)
Snowflake Boots (Make 2):
Starting in Sky Blue: R1: 6 sc in mr (6) • R2: 6 inc (12) • R3: [1 sc, inc] × 6 (18) • Rnds 4–6: 18 sc (3 rnds) • R7: 3 dec, 12 sc (15) • R8: 3 dec, 9 sc (12) • R9: 12 sc. Switch to Dark Brown: R10: In BLO, [2 sc, dec] × 3 (9) • Rnds 11–14: 9 sc (4 rnds) • R15: [1 sc, dec] × 3 (6). Close. Attach Snow White in Rnd 9 front loops and work 12 sc for cuff. Embroider white snowflakes.
Mittens & Twig Arms (Make 2):
Starting in Sky Blue: R1: 7 sc in mr (7) • R2: 7 inc (14) • Rnds 3–4: 14 sc (2 rnds) • R5: 4-dc bobble (thumb), 13 sc (14) • R6: 14 sc • R7: dec, 5 sc, dec, 5 sc (12). Stuff mitten. Switch to Dark Brown: R8: In BLO, [1 sc, dec] × 4 (8) • Rnds 9–15: 8 sc (7 rnds) • R16: 4 dec (4). Close. Attach White in Rnd 7 front loops, work 12 sc for cuff. Thread-joint all limbs to body!
Part 4: Reindeer Antler Earmuffs & Red Scarf
Earmuff Cups (Make 2 Sets):
• Outer Cup (x2 in Sky Blue): R1: 6 sc in mr (6) • R2: 6 inc (12) • R3: [1 sc, inc] × 6 (18) • R4: [2 sc, inc] × 6 (24) • Rnds 5–6: 24 sc (2 rnds). FO.
• Inner Cup (x2 in Dark Brown): Work Rnds 1–4 as above (24). Place wrong sides together with Outer Cup; work 24 sc through both layers to join. FO.
Headband & Reindeer Horns:
• Headband (Dark Brown): Make 2 strips: Ch 22, starting in 2nd ch: 21 sc. Hold strips together, sc around entire perimeter through both layers. Sew ends to Earmuff Cups.
• Reindeer Horns (Make 2 in Dark Brown): Small Tip: R1: 6 sc in mr (6) • Rnds 2–3: 6 sc (6). FO. Main Branch: R1: 6 sc in mr (6) • Rnds 2–4: 6 sc (3 rnds). R5: Hold Tip beside Branch and work 3 sc through both parts together, then 3 sc on Branch only (6) • Rnds 6–8: 6 sc (3 rnds). FO. Sew horns atop earmuff cups and sew assembly to head.
Crimson Red Scarf:
With Crimson Red: Ch 96; starting in 2nd ch: 95 sc, ch 1, turn. Row 2: 95 sc. FO and fringe ends. Tie snug around snowman’s neck!
Part 5: Bonus Holiday Gift Mitten Pouch
Mitten Pouch Base (Crimson Red or Sky Blue – 1.5 mm Hook):
• Thumb: R1: 6 sc in mr (6) • R2: 6 inc (12) • R3: [1 sc, inc] × 6 (18) • R4: [2 sc, inc] × 6 (24) • R5: [3 sc, inc] × 6 (30) • Rnds 6–14: 30 sc (9 rnds). FO.
• Mitten Body: Expand over Rnds 1–16 to 66 sc. Work 8 rounds even (Rnds 17–24).
• Join Thumb (Rnds 25–26): Work 15 sc through both Thumb and Mitten together, then 51 sc around (66). In Rnd 26, work around outer loops of thumb.
• Plush Fleece Cuff (3.5 mm Hook): Switch to White Plush Yarn. R34: [1 sc, skip 1 st] × 30 (30). Rnds 35–42: 30 sc (8 rnds). Fold cuff in half, attach hanging loop, and embroider white snowflakes!
Care, Archiving & Heirloom Maintenance
- Gentle Surface Cleaning: Spot-clean the cotton yarn with a damp microfiber cloth and cool, mild soapy water. Never soak the amigurumi head to preserve the dry blush pastel pigments.
- Antler & Limb Reshaping: If the twig arms or reindeer horns become flattened during off-season storage, gently roll each piece between your palms to restore round cylindrical definition.
- Acid-Free Fabric Storage: Archive in breathable cotton bags with natural cedar blocks to deter moths and maintain fresh fiber scents year after year.
Frequently Asked Questions
Can I use worsted weight #4 yarn instead of sport cotton?
Yes! Using worsted yarn with a 3.0 mm hook will scale the snowman up from 13 cm to approximately 20 cm (8 inches) tall. Adjust safety eyes to 10 mm or 12 mm for proportional balance.
How do I ensure the snowman sits upright on flat surfaces?
When stuffing the body base at Round 46, firmly flatten the bottom circle against a tabletop before working the final decrease rounds. You can also insert a small circular plastic craft disc into the base.
What is the best way to attach the twig arms and legs?
Use thread-jointing with strong upholstery thread passed straight through the lower body. This creates flexible, posable limbs that can dangle gracefully over mantel edges!
Save This Festive Snowman Pattern for Later
Ready to craft this charming winter amigurumi? Save this Christmas Snowman in Blue Reindeer Earmuffs pattern to your Pinterest holiday boards so you can crochet him whenever holiday inspiration strikes!