Bring cozy botanical sweetness to your holiday celebrations with this darling kawaii plush potted Christmas tree crochet pattern. Standing approximately 30 cm (12 inches) tall, this huggable holiday pine amigurumi is worked in cloud-soft #6 bulky chenille yarn with a 5.0 mm hook. Featuring three overlapping pine foliage tiers, surface-crocheted mustard bauble bobbles, a cheerful smiling burlap sack planter with 20 mm glossy safety eyes, and a crisp five-point golden star topper, it is the ultimate whimsical centerpiece for desks, mantels, and holiday gifting.
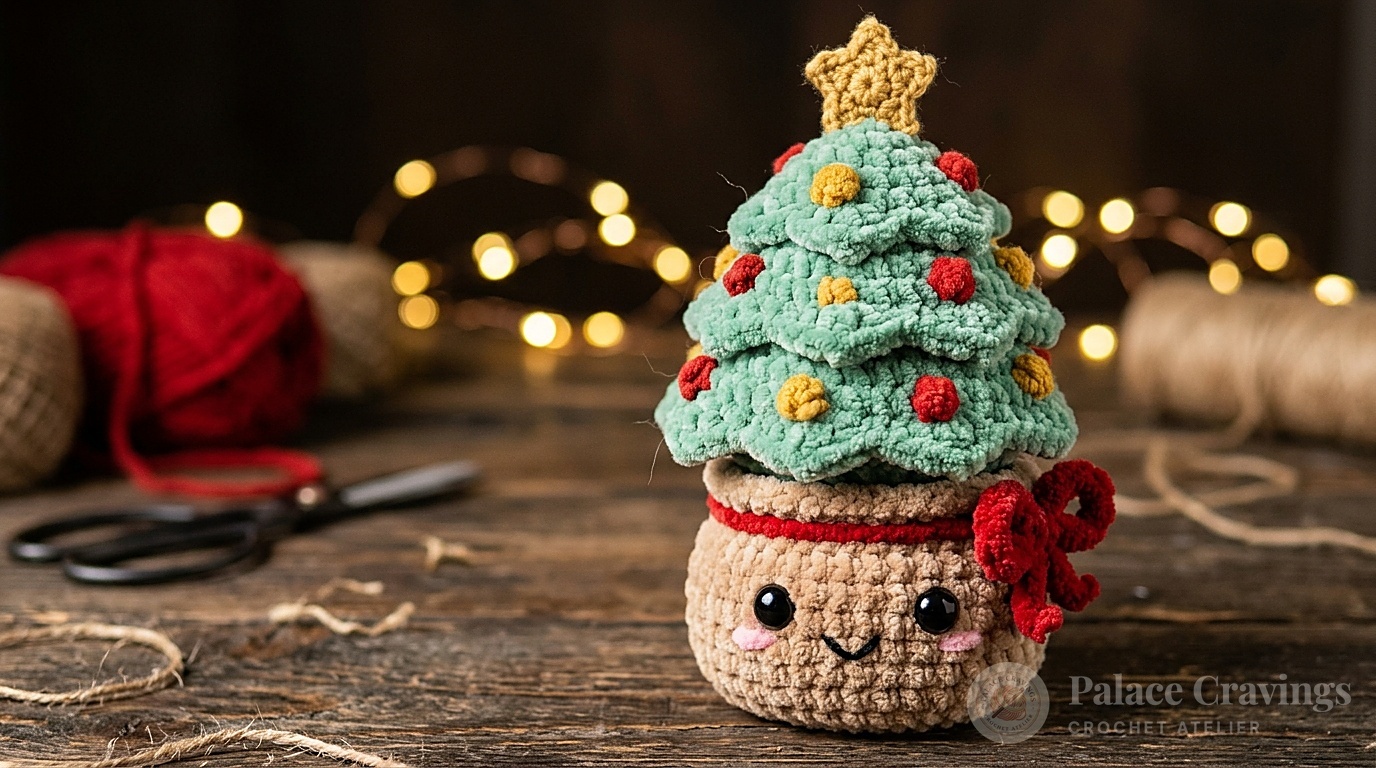
Unlike flat or flimsy novelty decor, this pattern utilizes an ingenious continuous tier architecture: rather than crocheting and sewing three separate tree cones, each progressive tier emerges directly from the preserved Front Loops of the previous tier’s base. The sturdy trunk stump locks firmly into a dense chocolate brown soil bed inside the weighted planter sack, allowing your festive little tree to stand perfectly upright on tabletop displays without wobbling.
Why You’ll Adore Crafting This Kawaii Holiday Tree
- Continuous 3-Tier Foliage Engineering: Zero seam matching across tree tiers—the hidden front-loop foundation creates realistic overlapping pine boughs effortlessly.
- Velvety Chenille Huggability: Worked in ultra-plush bulky chenille yarn for a luxurious, soft-touch boutique finish that appeals to kids and adults alike.
- Expressive Smiling Planter Sack: Adorable 20 mm glossy black safety eyes, embroidered pink blush, and a festive scarlet side bow bring the burlap pot to life.
- Perfect Tabletop Display Height: At 12 inches (30 cm) tall, it serves as an eye-catching standalone holiday accent or desktop companion throughout the winter season.
Key Materials & Color Breakdown

- Super-Soft Chunky Chenille Yarn (1 Ball Each / ~100g per skein):
- Color A (Spearmint Green / #5222): ~110 yards for 3-tiered pine tree body and foliage ridges.
- Color B (Mustard Yellow / #5140): ~25 yards for textured surface bobble baubles.
- Color C (Vanilla Fudge Beige / #5067): ~70 yards for burlap planter pot sack and turn-down rim.
- Color D (Scarlet Red / #5100): ~20 yards for pot collar trim and tied decorative side bow.
- Color E (Chocolate Brown / #5080): ~35 yards for soil insert and sturdy tree trunk stump.
- Color F (Primrose Gold Yellow / #5160): ~15 yards for 5-point star topper.
- Crochet Hook: 5.0 mm (US H-8) ergonomic aluminum crochet hook.
- Safety Eyes: 1 pair of 20 mm glossy black safety eyes with secure locking washers.
- Notions & Tools: Premium polyester cluster fiberfill stuffing, locking stitch markers (essential for marking loop transitions!), tapestry needle, and craft scissors.
Curated Atelier Essentials: Crocheting thick chenille yarn with tight, hole-free amigurumi tension requires ergonomic comfort and ultra-smooth glide:
Ergonomic 5.0mm Crochet Hook with Soft Elastomer Grip
Precision-machined polished aluminum head glides effortlessly through plush chenille fibers without snagging, while the ergonomic contoured handle prevents hand strain during tight amigurumi tensioning.
Step-by-Step Construction Walkthrough
Part 1: 3-Tiered Pine Tree Foliage Architecture: The tree begins at the very top tip in Color A (Spearmint Green) with 6 single crochet in a magic ring, expanding gradually over 6 rounds into an 18-stitch cone. Round 7 is worked in Back Loops Only (leaving the outer Front Loops free for surface baubles), while Round 8 closes the base of the top cone in BLO. Reattaching yarn into the preserved Front Loops of Round 8 immediately builds the middle pine tier! Repeat this loop transition to build the spacious 42-stitch base tier, lightly stuffing each tier before tapering shut.

Part 2: Surface Bauble Bobble Detailing: Hold the tree upright and rejoin Color A into the unworked outer front loops around the lower rim of each tier. Work single crochet stitches in green, switching to Color B (Mustard Yellow) only for 4-double-crochet bobble stitches: 6 bobbles around Tier 1, 6 bobbles around Tier 2, and 6 bobbles around Tier 3. Working the bobbles in contrasting gold gives the appearance of glowing holiday lights embedded in the lush evergreen foliage.
Part 3: Smiling Planter Sack & Red Collar: Start in Color C (Vanilla Fudge) to crochet the circular base of the burlap sack, expanding to 42 stitches. Work even rounds upward to form the sack walls. At Round 9, insert the 20 mm black safety eyes spaced 7 stitches apart. Work Round 11 in Front Loops Only with Color D (Scarlet Red) to create a vibrant decorative collar band, then switch back to Color C to work the wavy turn-down rim finished with loose slip stitches.
Part 4: Chocolate Soil Bed & Scarlet Side Bow: Rejoin Color E (Chocolate Brown) into the 30 Back Loops left inside the neck of the pot from Round 11. Work decreasing rounds to create the level soil insert, firmly stuffing the planter sack before closing. Next, join Scarlet Red yarn at the collar and work two 22-chain cords, tying them into a cheerful side bow beside the right eye.
Part 5: Golden Star Topper & Tree Trunk Assembly: Make a magic ring in Color F (Primrose Gold) and work all 5 star points directly into the ring: (1 sc, 1 dc, ch 1, 1 dc, 1 sc) × 5. Pull the ring tight and pinch each ch-1 peak to shape crisp star points. Crochet a sturdy cylinder stump in chocolate brown, sew it to the bottom of the tree base, and anchor the trunk firmly into the center of the pot’s brown soil bed!
3 Chef Secrets for Flawless Chenille Amigurumi Trees
1. Weighted Sack Base for Zero Tipping: While fiberfill provides great shape, a tall 12-inch amigurumi can become top-heavy. Place a handful of clean glass crafting beads or poly-pellets enclosed inside a nylon stocking into the bottom of the planter sack before stuffing with fiberfill. This gives the base satisfying heft so it never tips over on polished wooden shelves.
2. Shaping Crisp 5-Point Star Peaks: Chenille yarn is plush and soft, which can sometimes round out sharp corners. When crocheting the star topper, pull the chain-1 peak firmly with your fingernails and apply a tiny dab of clear fabric glue or steam lightly over a blocking board. The star will hold its crisp geometric silhouette permanently.
3. Seamless Loop Transition Markers: Because chenille stitches are textured and dense, picking up unworked front loops can be tricky if you miss a stitch. Always place a brightly colored locking stitch marker into the first unworked loop of every transition round as you crochet past it. When returning to build the next tier or soil, you’ll find the exact starting point instantly.
Holiday Mantel Styling & Festive Vignettes

- Tiered Tray & Bookcase Companion: Perfect scale for farmhouse tiered trays, holiday hot cocoa stations, and cozy winter book nook vignettes.
- Playful Children’s Room Decor: Soft, squishable, and 100% unbreakable, making it a safe holiday tree alternative for nurseries and toddler bedrooms.
- Festive Office Desk Cheerful Mascot: Brightens corporate or home workspaces with handcrafted holiday warmth all season long.
Care & Storage Guidelines
- Surface Cleaning: Gently wipe plush chenille with a slightly damp microfiber cloth. Do not soak in water or machine wash to preserve the safety eye shine and structural stuffing.
- Restoring Chenille Loft: If the velvet pile becomes compressed during holiday storage, use a clean soft baby hairbrush to gently fluff the fibers back to full volume.
- Dust-Free Storage: Store upright inside a sturdy shoe box or breathable cotton storage bag. Avoid stacking heavy winter items directly on top of the foliage tiers.
Pattern Summary: Kawaii Plush Potted Christmas Tree
Skill Level: Beginner–Intermediate • Finished Height: ~30 cm (12 inches) • Hook: 5.0 mm (US H-8) • Yarn Weight: #6 Super Bulky Chenille • Terminology: Standard US Terms.
| Component | Yarn & Color | Key Technique / Rounds | Stitch Count |
|---|---|---|---|
| Pine Tier 1 (Top) | Spearmint Chenille (5.0mm) | Rnds 1–6 (18 sts). R7 in BLO (leaves FLOs for baubles). R8–9 BLO decrease & close. | 18 to 6 sts |
| Pine Tier 2 (Mid) | Spearmint Chenille | Reattach to R8 FLOs. R11–15 expand to 30 sts. R16 in BLO. R17–19 BLO close. | 30 to 5 sts |
| Pine Tier 3 (Base) | Spearmint Chenille | Reattach to R17 FLOs. R21–24 expand to 42 sts. R25–28 BLO close & seal. | 42 to 7 sts |
| Bauble Bobbles | Mustard Yellow Chenille | Surface-worked into unworked FLOs: 6 bobbles / tier separated by sc stitches. | 18 gold bobbles |
| Planter Sack Pot | Vanilla Fudge Chenille | Rnds 1–8 expand to 42 sts. R9: insert 20mm eyes. R11 FLO in red. R14: sl st rim. | 42 sts sack |
| Soil Bed Insert | Chocolate Brown | Rejoin inside Rnd 11 BLOs: 30 sc around, decrease to 6 sts over stuffing. | Level soil bed |
| Scarlet Side Bow | Scarlet Red | Work two ch-22 strands at collar BLOs; tie into sweet side bow. | Accent bow |
| Golden Star Topper | Primrose Gold Chenille | (1 sc, 1 dc, ch 1, 1 dc, 1 sc) × 5 directly into MR. Pinch 5 peaks. | 5-point star |
| Tree Trunk Stump | Chocolate Brown | Rnds 1–4 cylinder (12 sts). Sew top to tree base, bottom into soil. | Anchored trunk |
Frequently Asked Questions
Can I use worsted weight acrylic yarn instead of chenille?
Yes! Using medium #4 worsted acrylic with a 3.5 mm hook produces an adorable miniature potted tree approximately 15 cm (6 inches) tall. Use 10 mm safety eyes instead of 20 mm.
How do the pine tiers stay together without seams?
The pattern builds each tier directly out of the Front Loops of the previous tier’s closing round. This continuous construction eliminates separate piece alignment and creates natural overlapping branches.
Will the potted tree stand upright on its own?
Yes! The flat 42-stitch circular base of the sack combined with the firmly packed soil bed keeps the tree balanced. Adding plastic pellets or glass beads to the base provides extra stability.
Save This Kawaii Tree Pattern to Pinterest
Love this cozy holiday pine project? Pin these official tutorial pins to your Pinterest crochet boards: