Handcrafted holiday amigurumi reaches its most enchanting pinnacle when playful engineering meets whimsical character design, and this Interactive Peek-a-Boo Reindeer in Gift Sack is pure festive magic in motion. Designed as a clever 2-in-1 pop-up mechanical fiber toy, a gentle press tucks the darling fawn safely inside his drawstring Christmas sack (standing a compact 6.5 cm tall), while pulling the drawstring or pushing from below reveals the full 9.5 cm reindeer perched cheerfully over the ruffled rim. Complete with two-tone hooves, branched twig antlers, an embroidered Christmas tree appliqué, and two miniature gift boxes tied with mustard bows, this interactive project is an unforgettable holiday keepsake for children and collectors alike.
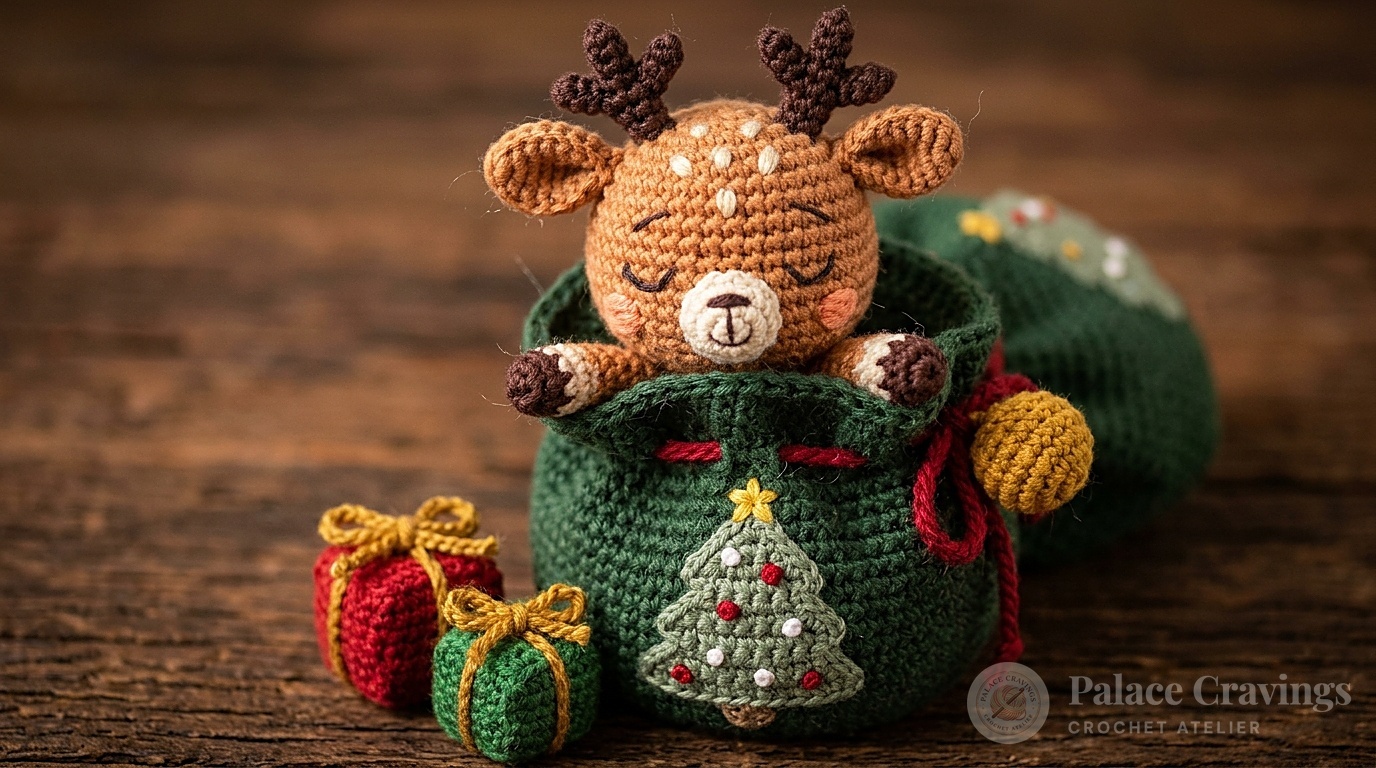
What makes this creation extraordinary is its seamless kinetic architecture. The reindeer fawn is securely joined to a concave interior bowl structure nestled within the outer dark green sack walls. Working through both the inner bowl and outer sack layers creates a flexible telescopic chamber that guides the reindeer upward and downward smoothly without tangling or wearing down fibers. Embroidered sleeping eyes, rosy peach cheeks, and delicate cream forehead dapples give the reindeer a serene, storybook expression that captivates crafters of all generations.
Why You’ll Love Crafting This Interactive Pop-Up Toy
- 2-in-1 Kinetic Pop-Up Mechanics: Seamlessly transitions between a tucked-away 6.5 cm drawstring present bag and a fully extended 9.5 cm Christmas reindeer fawn.
- Double-Layer Telescopic Base: Ingenious joined-layer crochet creates a durable sliding channel that withstands repeated interactive play without losing structural shape.
- Intricate Storybook Details: Two-tone hooves, branched twig antlers, cream muzzle, and French-knot Christmas tree appliqué bring classic European folklore to life.
- Miniature Present Box Accessories: Includes two tiny 3D gift cubes with wrapped mustard chained ribbons that tuck neatly into the sack alongside the reindeer!
Key Materials, Notions & Color Palette

- Sport-Weight Cotton Blend Yarn (55% Cotton, 45% Acrylic, 50g/160m):
- Fawn Light Brown: ~35 yards for reindeer head, body, outer ear borders, and interior telescopic bowl.
- Dark Chestnut Brown: ~15 yards for hooves, branched antlers, and inner ear centers.
- Forest Dark Green: ~45 yards for outer gift sack body and large miniature present box.
- Sage Green: ~10 yards for flat Christmas tree front appliqué.
- Festive Crimson Red: ~20 yards for woven drawstring cord, small present box, and French knot tree ornaments.
- Cream / Off-White: ~10 yards for snout muzzle, forehead dapples, and tree ornament French knots.
- Golden Mustard Yellow: ~15 yards for drawstring ball stopper, tree star, and present box ribbons.
- Leftover Black & Peach Floss: For embroidered sleeping curved eyes, sweet smile, and blushed cheeks.
- Crochet Hook: 2.0 mm (US Steel 4 / UK 14) for tight, non-stretching amigurumi gauge.
- Notions & Tools: Premium cluster polyester fiberfill stuffing, tapestry needle, embroidery needle, stitch markers, and sharp precision scissors.
Curated Atelier Essentials: Crocheting dense kinetic amigurumi with a 2.0 mm hook requires precision tip alignment and smooth throats to prevent snagging during double-layer joining rounds:
Ergonomic Aluminum Crochet Hook Set with Cushioned Comfort Grips
Ultra-smooth tapered aluminum throats glide cleanly through tight sport cotton fibers without splitting strands, while contoured elastomer handles provide fatigue-free comfort when crafting delicate pop-up toys and miniature gift boxes.
Step-by-Step Construction Walkthrough
Part 1: Reindeer Fawn Head, Body & Two-Tone Arms: Work the reindeer head in Light Brown spirals through Round 18. At Round 19, work in Back Loops Only (BLO) before decreasing to 6 stitches to close the neck. Attach Light Brown to the Round 19 front loops and work 4 rounds of 24 single crochet to form the lower body cylinder. For the arms, start with Dark Brown hooves, transition to Light Brown, flatten the tops, and sew just beneath the head.
Part 2: Double-Layer Telescopic Bowl & Sack Junction: Crochet a 24-stitch Light Brown bowl base. At Round 4, place the reindeer body under the bowl and work [3 sc, inc] × 6 (30 sts) straight through both layers simultaneously, lightly stuffing the body as you seal it! Continue expanding the bowl through Round 10. Switch to joined rounds and work Round 11a in BLO, finishing with a double crochet rim (Round 12a). Join Forest Dark Green into the front loops of Round 10 and work through both layers at Round 12, locking the inner sliding bowl permanently into the sack base.

Part 3: Present Sack Walls, Eyelet Row & Drawstring Stopper: Expand the sack walls upward in Dark Green double crochet through Round 27. Round 29 establishes the functional drawstring eyelets: [sc, ch 2, skip 2] × 20 (21 spaces). Rounds 30 and 31 fan outward into an 91-stitch ruffled decorative rim. Weave a Crimson Red 86-chain cord through the eyelets and anchor both ends inside a neat Golden Mustard amigurumi ball stopper.
Part 4: Christmas Tree Appliqué & Miniature Present Boxes: Crochet a flat Sage Green triangle tree in turning rows and embroider with vibrant red and cream French knot ornaments, a brown trunk, and a mustard star before stitching to the sack front. For the gift boxes, work continuous rounds with 3-sc corner increases in Back Loops Only to create crisp, sharp 3D cubes. Wrap each box with a mustard chain ribbon and tie a neat holiday bow atop!
3 Master Techniques for Heirloom Results
1. Precise Inner Bowl Alignment: When joining the reindeer body to the Light Brown bowl base at Round 4, make sure the reindeer face aligns squarely with the front side of the bowl. This ensures that when the sack walls are built upward, the reindeer looks straight ahead through the center opening.
2. Crisp Cube Corners on Gift Boxes: Working Rounds 5 and 12 in Back Loops Only (BLO) forces the fabric to fold at an exact 90-degree right angle. When stuffing with fiberfill, gently push stuffing into each of the four corners with the eraser end of a pencil to maintain sharp cubic definition.
3. Smooth Pop-Up Action Tuning: Do not over-stuff the lower reindeer body or the inner bowl cavity. Keeping the interior flexible allows the fabric to telescope inward effortlessly when pushed, creating a satisfying, effortless pop-up action every single time.
Holiday Mantel Styling & Festive Vignettes

- Christmas Eve Stocking Stuffer Surprise: Tuck the reindeer fully inside the cinched gift sack and place it atop a child’s Christmas stocking. Watching their delight as they pull the drawstring to reveal Santa’s reindeer is pure holiday joy!
- Interactive Holiday Centerpiece: Group with handmade evergreen trees, wooden nutcrackers, and vintage brass candleholders on a holiday runner for interactive dinner table amusement.
- Treasured Handmade Gift Set: Packaged with the two tiny gift boxes in a kraft paper box with tissue paper, this kinetic toy becomes a cherished family heirloom treasured across childhood years.
Complete Written Pattern (Standard US Terms)
Abbreviations (US Terms): MR = magic ring; ch = chain; sc = single crochet; dc = double crochet; sl st = slip stitch; inc = 2 sc in same st; inc3 = 3 sc in same st; dec = sc2tog; sc3tog = single crochet 3 sts together; BLO = back loop only; FLO = front loop only; FO = fasten off.
Part 1: Reindeer Arms, Head, Body, Ears, Antlers & Snout (2.0 mm Hook)
Arms (Make 2):
Start with Dark Brown: R1: 5 sc in MR (5) • R2: 5 inc (10). Switch to Light Brown: R3: 10 sc (10) • R4: [3 sc, dec] × 2 (8) • Rnds 5–8 (4 rnds): 8 sc (8). Do not stuff. Flatten arm, skip 1st st, work 3 sc through both layers. FO leaving 15 cm tail.
Reindeer Head (Light Brown):
• Rnd 1: 6 sc in MR (6).
• Rnd 2: 6 inc (12).
• Rnd 3: [1 sc, inc] × 6 (18).
• Rnd 4: [1 sc, inc, 1 sc] × 6 (24).
• Rnd 5: [3 sc, inc] × 6 (30).
• Rnd 6: [2 sc, inc, 2 sc] × 6 (36).
• Rnds 7–9: 36 sc around (3 rnds).
• Rnd 10: [5 sc, inc] × 6 (42).
• Rnds 11–14: 42 sc around (4 rnds).
• Rnd 15: [5 sc, dec] × 6 (36).
• Rnd 16: [4 sc, dec] × 6 (30).
• Rnd 17: [3 sc, dec] × 6 (24).
• Rnd 18: [2 sc, dec] × 6 (18).
• Rnd 19: In BLO, [1 sc, dec] × 6 (12). Stuff firmly.
• Rnd 20: 6 dec (6). Pull through front loops to close.
Reindeer Lower Body (Light Brown):
Attach Light Brown at 2nd front loop left of Head R18 (from R19 BLO):
• Rnd 1: In FLO, [2 sc, inc] × 6 (24).
• Rnds 2–4: 24 sc around (3 rnds). Invisible finish.
Two-Tone Folded Ears (Make 2):
With Brown: Ch 4; from 2nd ch: 2 sc, 4 sc in last st, on other side: 2 sc (8), ch 1. Switch to Light Brown: R2: Turn, 3 sc, inc, ch 2, sl st in 2nd ch from hook, inc, 3 sc (11). Pull tail through 1st st and pinch base fold.
Branched Antlers (Make 2 in Dark Brown):
Ch 5, sl st in 2nd ch from hook, sl st in next ch (mark this ch), ch 3, from 2nd ch: 2 sl st, sl st into marked ch, 2 sl st along main stem. FO with 15 cm tail.
Cream Snout:
With Cream: Ch 4; from 2nd ch: 2 sc, inc3, other side: 1 sc, inc (8). R2: inc, 1 sc, 3 inc, 1 sc, 2 inc (14). R3: 14 sc (14). Invisible finish. Embroider black nose and smile.
Part 2: Inner Bowl, Body Join & Upper Sack Base
Inner Bowl (Light Brown):
• Rnd 1: 8 sc in MR (8) • Rnd 2: 8 inc (16) • Rnd 3: [1 sc, inc] × 8 (24).
• Rnd 4 (Join Body): Place reindeer body under bowl; work through both layers simultaneously: [3 sc, inc] × 6 (30). Lightly stuff body before completing join!
• Rnds 5–7: Expand evenly to 48 sc.
• Rnds 8–10: 48 sc around, sl st into 1st st.
• Rnd 11a: Ch 1, in BLO: 48 sc (48), sl st to 1st st.
• Rnd 12a: Ch 3, skip sl st st, 2 dc, dc inc, [3 dc, dc inc] × 11 (60), sl st to 3rd ch. FO.
Sack Connection Rnds 11–16 (Dark Green):
Join Dark Green to front loop of R10: ch 3, work 60 dc in FLO, sl st to 3rd ch. Rnd 12: Work through both Dark Green and Light Brown layers: 70 sc. Rnds 13–16: Decrease evenly in double crochet to 49 dc. Pause to assemble reindeer face!
Part 3: Present Sack Walls, Eyelet Row & Drawstring Stopper
Continue in Dark Green joined rounds:
• Rnd 17: Ch 1, in BLO, [6 sc, inc] × 7 (56), sl st.
• Rnd 18: Ch 3, in BLO, 55 dc (56), sl st. (Fold sack base along R17–18 ridge).
• Rnds 19–20: Expand to 70 dc.
• Rnds 21–27: 7 rounds even: 70 dc around.
• Rnd 28: [8 dc, dc dec] × 6, 7 dc (63).
• Rnd 29 (Drawstring Eyelets): Ch 1, sc in same ch, ch 2, skip 2 sts, [sc, ch 2, skip 2] × 20 (21 sc + 21 ch-2 spaces), sl st.
• Rnd 30: Ch 3, [3 dc in ch-2 space, dc in sc] × 20, 3 dc in last space (84).
• Rnd 31 (Ruffle Rim): Ch 3, [11 dc, dc inc] × 6, 10 dc (91), sl st. FO & weave in.
Drawstring Cord & Stopper Ball:
• Red Cord: Ch 86. Weave in and out through the 21 eyelets of Rnd 29, exiting both ends on the left.
• Mustard Stopper Ball: R1: 6 sc in MR (6) • R2: 6 inc (12) • R3: (3 sc, inc) × 3 (15) • R4: 15 sc • R5: (3 sc, dec) × 3 (12). Knot both red cord ends to starting tail, tuck inside, then work 6 dec (6) and close.
Part 4: Christmas Tree Appliqué & Miniature Present Boxes
Sage Green Christmas Tree Appliqué:
Worked flat in turning rows: Row 1: Ch 2, inc in 2nd ch (2). Rows 2–8: Expand with edge increases to 10 sc across. Embroider red and white French knots, brown trunk, and mustard star. Sew to sack front between Rnds 22–26.
Miniature 3D Present Boxes:
• Large Box (Dark Green): R1: 4 sc in MR (4) • R2: [inc3] × 4 (12) • R3: [sc, inc3, sc] × 4 (20) • R4: [2 sc, inc3, 2 sc] × 4 (28) • R5: In BLO, 28 sc (28) • Rnds 6–11: 28 sc (6 rnds) • R12: In BLO, [2 sc, sc3tog, 2 sc] × 4 (20) • R13: [sc, sc3tog, sc] × 4 (12). Stuff lightly, shaping cube corners. R14: 6 dec (6), close.
• Small Box (Red): Work similarly through 20-stitch square base, 4 rounds of height, and BLO top decreases to form a crisp red cube.
• Mustard Ribbons: Make ch 75 (Large Box) and ch 60 (Small Box). Center under base, bring to top, twist across, pass under bottom, and tie a crisp gift bow on top!
Care, Archiving & Heirloom Maintenance
- Gentle Spot Cleaning: Hand spot-clean using a damp cotton cloth and mild, fragrance-free wool wash. Avoid submerging the kinetic inner bowl in water to preserve fiber density.
- Drawstring Care: If the red drawstring cord loosens after extended play, gently pull the mustard stopper ball outward while holding the cord base to reset tight cord tension.
- Safe Off-Season Storage: Store with the reindeer in the fully popped-up position inside a breathable cotton bag alongside the miniature gift boxes to preserve ear and antler shape.
Frequently Asked Questions
Can I use safety eyes instead of embroidered eyes?
Yes! You can insert 6 mm black safety eyes between Rounds 10 and 11 spaced 7 stitches apart before stuffing the reindeer head.
Why is the inner bowl worked in joined rounds while the head is in spirals?
Joined rounds ensure the top rim of the bowl remains strictly level and horizontal, preventing the reindeer from tilting sideways inside the gift sack.
Can small treats be placed inside the sack?
Yes! There is ample room inside the gift sack around the reindeer’s base to hold small holiday treats, foil-wrapped chocolates, or miniature gift notes.
Save This Interactive Reindeer Pattern for Later
Planning your holiday handmade crafting? Save this Interactive Peek-a-Boo Reindeer pattern to your Pinterest holiday crochet boards so you have it ready to create this magical gift!