Few holiday crafts carry as much nostalgic charm and enduring beauty as delicate handmade lace snowflakes. This Delicate Crochet Snowflake Ornament captures the timeless magic of winter frost in four swift rounds of crochet. Designed with a central openwork wheel that blooms into six radiating star petals and delicate picot crests, it adds an artisanal, heirloom glow to fresh evergreen branches, holiday garlands, window valances, and tied gift boxes.
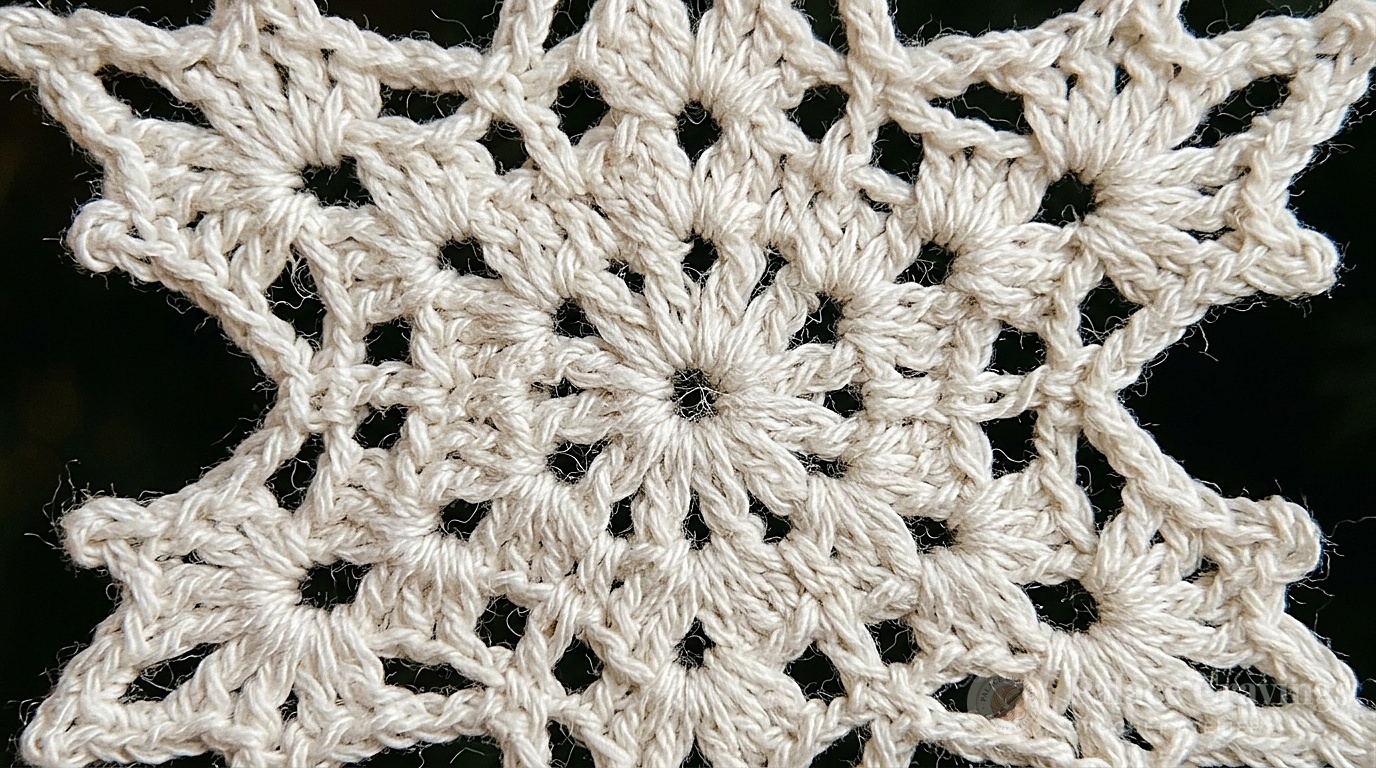
Crocheted with crisp white worsted yarn and a 3.75mm (Size F-5) hook, the slightly denser stitch tension gives this 5-inch ornament crisp structural definition that holds its shape gracefully on the tree. Because each snowflake takes less than 20 minutes from magic ring to final fastening off, it is the perfect zero-waste stash-busting project to make in multiples while watching holiday movies or prepping thoughtful teacher and hostess gifts.
Why You’ll Love Making These Crochet Snowflakes
- Lightning-Fast 20-Minute Makes: Four concise rounds mean you can easily crochet an entire baker’s dozen of coordinating ornaments over a single cozy evening.
- Zero Complex Joins: Worked seamlessly in the round from the center outward, eliminating tedious finishing or piecing together small components.
- Versatile Holiday Decorating: Drapes effortlessly from Christmas tree branches, tapes cleanly to festive greeting cards, adorns wrapped packages, or hangs across mantels as a winter snowflake garland.
- Budget-Friendly Heirloom: A single 7-ounce skein of Red Heart Super Saver yields more than 30 full-sized snowflakes, making handmade gifting accessible and sustainable.
Essential Tools for Precision Lacework & Ornaments
Achieving crisp picots and uniform snowflake geometry requires fine ergonomic hooks and blocking essentials:
Clover Amour Ergonomic Hook (Size F / 3.75mm)
The optimal size for crisp snowflake picots. The silky aluminum throat glides cleanly into fine chain loops without snagging plies.
Blocking Mats with Grid Lines & T-Pins Set
Dense foam mats with concentric circular guidelines. Essential for pinning out the 6 snowflake points into symmetrical star geometry.
Fiskars 5″ Precision Micro-Tip Scissors
Fine pointed blades snip clean tails close to the lacework knots without nicking surrounding chain loops.
Clover Chibi Steel Tapestry Needles
Fine bent tips weave tiny tail ends invisibly through dense central ring single crochet stitches.
As an Amazon Associate, Palace Cravings earns from qualifying purchases.
Key Materials & Pattern Specifications

- Yarn: Red Heart® Super Saver® (100% acrylic; 7 oz/198 g; 364 yds/333 m). Color: White (#311) — 1 skein (sufficient to make dozens of ornaments).
- Crochet Hook: Size U.S. F/5 (3.75 mm), or size needed to obtain gauge.
- Notions: Steel tapestry needle for weaving ends, sharp embroidery scissors, fine gold satin ribbon or metallic thread for hanging loops.
- Finished Dimensions: Approximately 5 inches [12.7 cm] in diameter from tip to tip.
- Gauge: Snowflake measures 5 inches in diameter upon completion. Take time to check your tension so the snowflake remains flat rather than curling into a cup shape!
Stitch Abbreviations & Special Techniques
- Ch: Chain
- Sc: Single crochet
- Hdc: Half double crochet
- Dc: Double crochet
- Sl st: Slip stitch
- Picot Tip: A cluster of chains (such as ch-3 and ch-5) worked together to form sharp decorative star peaks at the outer extremities.
Step-by-Step Crochet Snowflake Tutorial
The Foundation Ring & Round 1: Central Wheel
Foundation: With White yarn, ch 6. Join with a slip stitch into the first chain to form a neat ring.
Round 1: Ch 1. Work 12 sc into the center of the ring. Join with a slip stitch in the first single crochet. (12 sc total).
Round 2: Establishing the 12 Openwork Chain Loops
This round sets up the twelve spoke anchors that will blossom into the 6 outer star shells:
Round 2: Ch 1. Sc in first st. [Ch 3, sc in next sc] 11 times. To join and form the 12th loop without fastening off: work 1 hdc in the first sc. (12 ch-3 spaces created).

Round 3: Sculpting the 6 Shell Petals
Here you build the six structural arms of the star by alternating shell clusters with anchoring single crochets:
Round 3: Ch 1. Sc over the joining hdc from Round 2. *(2 dc, ch 3, 2 dc) in the next ch-3 space**, 1 sc in next ch-3 space. Repeat from * around 5 more times, ending the last repeat at **. Join with a slip stitch in the first single crochet. (6 distinct shell clusters separated by sc valleys).
Round 4: The Crystalline Picot Star Points
This outer round adds delicate filigree peaks that define authentic crystalline geometry:
Round 4: Ch 4, slip stitch in same st as joining (forming a valley loop). *Ch 2. In the next center ch-3 space of the shell, work: (1 sc, ch 3, 1 sc, ch 5, 1 sc, ch 3, 1 sc) — this triple picot forms the dramatic sharp snowflake point! Then work ch 2**, followed by (slip st, ch 4, slip st) into the next anchoring single crochet. Repeat from * around, ending last repeat at **. Join with a slip stitch into the very first slip stitch of the round. Fasten off securely and weave in ends neatly with your tapestry needle.
3 Designer Secrets for Crisp Star Points & Stiffening
1. Pin-Block While Damp: Acrylic yarn has gentle memory. Pin each of the 6 main ch-5 tips and intermediate ch-3 loops to a foam blocking mat with rust-proof T-pins. Spritz thoroughly with warm water (or hover a steam iron 1 inch away) and allow to dry completely for crisp, geometric points.
2. Easy Fabric Stiffener for Tree Rigidity: If you prefer firm, rigid snowflakes that resist bending, dip your finished snowflakes into a 50/50 mixture of white craft glue and water (or liquid starch). Squeeze out excess liquid, pin out flat on wax paper over blocking mats, and let dry overnight.
3. Elevate with Metallic Ribbon Loops: Cut a 7-inch length of 1/8-inch metallic gold or silver satin ribbon. Thread both ends through the top ch-5 loop of one snowflake point and tie a tight overhand knot, creating an opulent 3-inch hanging loop that glimmers among Christmas tree lights.
Styling & Holiday Decorating Inspirations

Handmade lace snowflakes bring a cozy, heirloom warmth to your entire home:
- Evergreen Tree Focal Points: Scatter 15 to 20 snowflakes evenly across your tree alongside vintage glass balls and warm white fairy lights for an elegant winter wonderland theme.
- Window Frost Valances: String snowflakes at varying heights with clear nylon fishing line across your living room or kitchen window for the illusion of floating indoor snowfall.
- Artisan Gift Wrapping: Tie a snowflake onto brown kraft paper packages with red baker’s twine or velvet ribbon as an extra keepsake gift topper.
- Holiday Table Place Cards: Lay one snowflake flat on each dinner napkin and tuck a handwritten place card into the center loop for festive holiday dinner hosting.
Care & Storage Guidelines
- Cleaning: Hand wash gently in cool water with a drop of gentle soap. Lay flat on a clean dry towel and re-pin the picot tips if needed.
- Annual Storage: Store snowflakes flat between sheets of parchment or tissue paper inside a rigid shallow container or shoebox. This prevents delicate picot points from crushing during off-season packing.
Frequently Asked Questions
Can I make these smaller or larger?
Yes! For miniature 2.5-inch snowflakes, use size 10 crochet cotton thread with a 1.5mm steel hook. For oversized 7-inch statement wall snowflakes, switch to bulky yarn and a 6.0mm hook.
Why is my snowflake curling up in the center?
Curling is usually caused by tight tension in Round 1 or Round 2. Make sure you don’t pull your initial chains too tightly, or switch to a slightly larger hook (4.0mm) for the foundation ring.
Can I use glitter yarn?
Absolutely! Yarns with a subtle metallic thread plied in (such as Caron Simply Soft Party or Red Heart Super Saver Metallic) create dazzling holiday shimmer.
Save This Pattern to Pinterest
Love this holiday project? Save these high-resolution pins to your Christmas crochet boards so you have the tutorial ready whenever winter crafting inspiration strikes!