Bring the timeless enchantment of an alpine evergreen forest into your home with this stunning Festive Crochet Christmas Tree Duo. Standing 8½ inches tall with a stable 5½-inch wide circular base, this pair of freestanding tabletop trees combines rich textured shell-stitch boughs with delicate pearl button ornaments and a radiant 5-point golden star crown. Worked in worsted-weight yarn using a 5.0mm hook, these durable, structured trees require zero polystyrene foam cores. Whether styled as a warm centerpiece for holiday dinner parties, displayed on a rustic fireplace mantel, or gifted to loved ones as handcrafted holiday keepsakes, this festive duo brings cozy artisan wonder to any space.
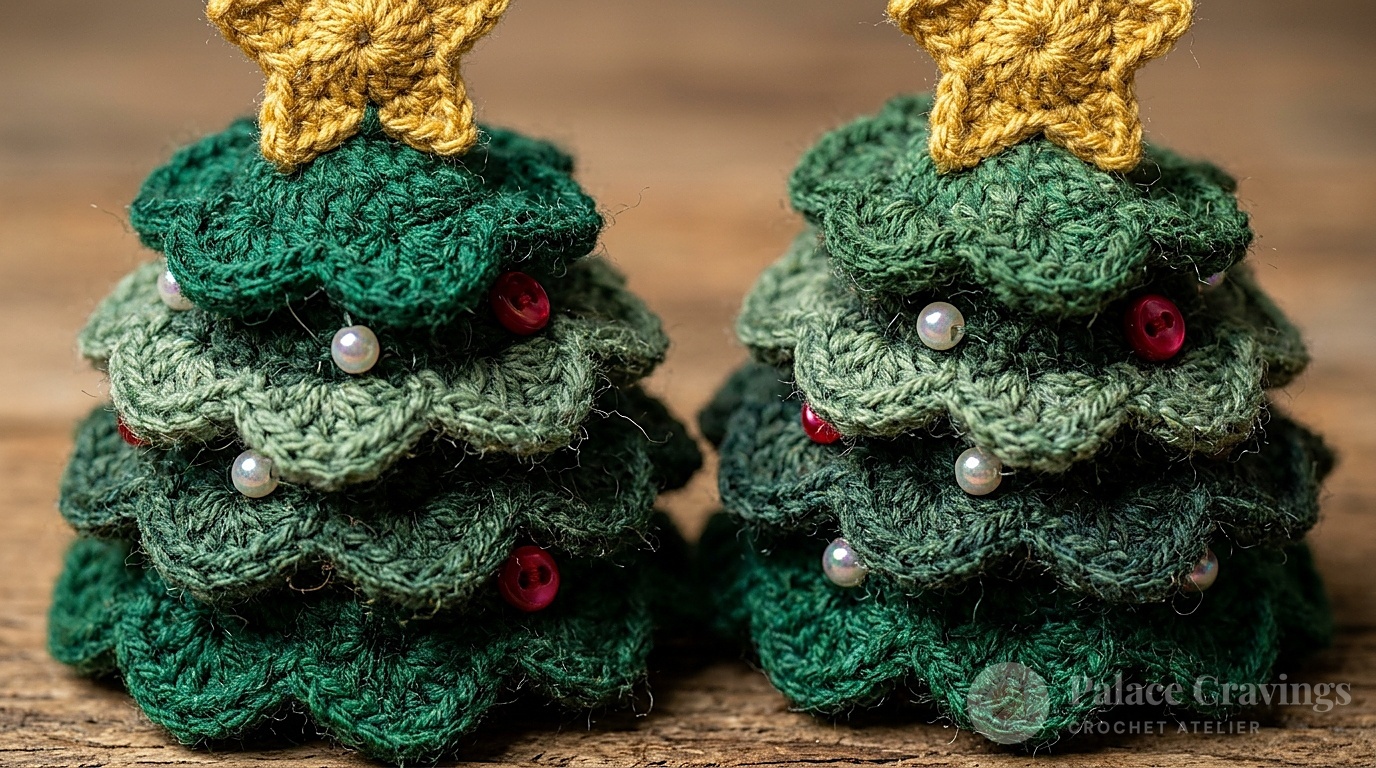
Designed originally by Sharon Mann for Red Heart, this clever pattern offers two distinctive tree aesthetics. Tree 1 is worked as a textured cone base embellished with 21 to 24 iridescent pearl buttons or berry beads, while Tree 2 features tiered scalloped ruffles worked directly into the surface ridges of the cone. The circular base is weighted with clean polyester fiberfill and an optional cardboard or plastic stabilizer disc, ensuring your trees remain sturdy and upright season after season.
Why You’ll Love Making This Christmas Tree Duo
- 100% Freestanding Architecture: The weighted circular base and dense stitch gauge eliminate the need for foam cones, making them washable, reusable, and easy to pack flat or fluff.
- Customizable Embellishments: Decorate with vintage buttons, shiny sequins, mini wooden beads, or tiny red berry accents to suit your personal aesthetic.
- Two Coordinating Textures: Working both trees provides visual contrast—one sleek with jeweled button accents and the other full of lush, ruffled evergreen branches.
- Heirloom Holiday Keepsake: Unlike fragile glass or ceramic holiday decor, these sturdy yarn trees withstand years of seasonal display without chipping or breaking.
Key Materials & Tools Needed

- Yarn Selection: Category 4 Worsted Weight Yarn (such as Red Heart Super Saver or Bernat Super Value) in Green Tones / Forest Green (Color A), Mistletoe / Lime (Color B), Cherry Red (Color C), and Bright Yellow (for the tree-topping star).
- Crochet Hook: 5.0 mm (US H-8) ergonomic hook. This size creates tight, dense cone walls that support their own weight firmly.
- Stuffing & Foundation: Polyester fiberfill stuffing and a 5-inch circular cardboard or plastic template (cut from clean packaging) for a perfectly flat base.
- Embellishments & Notions: 21 to 24 small pearl buttons (7/16-inch diameter), blunt-end steel tapestry needle, stitch markers, and small craft scissors.
Step-by-Step Stitch Walkthrough
Part 1: The Weighted Foundation Base: With Forest Green (Color A), ch 2 or start with a magic ring. Round 1: Work 6 sc in ring; do not join, work in continuous rounds using a stitch marker (6 sc). Round 2: 2 sc in each sc around (12 sc). Round 3: *Sc in next sc, 2 sc in next sc; rep from * around (18 sc). Continue expanding in even 6-stitch increments until Round 10 (60 sc). The circular base should measure exactly 5½ inches in diameter. Work 1 round even in back loops only (BLO) to create a sharp structural rim that transitions upward into the cone walls.
Part 2: The Tapered Tree Cone: Working upward from the foundation rim, work 3 rounds of single crochet even (60 sc). On Round 4, begin gradual decreases: *Sc in next 8 sc, sc2tog; rep around (54 sc). Alternate 2 rounds even with 1 decrease round, steadily tapering the circumference. As the cone narrows, pause to insert the 5-inch flat plastic disc into the base and pack fiberfill firmly beneath it. Continue tapering until 6 stitches remain at the apex; cinch tight and fasten off.

Part 3: The Multi-Tiered Ruffled Branches (Tree 2): For the second tree, join Color B (Mistletoe) to the free front loops of the surface ridges. Work: *Sc in next st, ch 3, 3 dc in next st, ch 3, sl st in next st; rep from * around each tier. This creates lively, cascading scalloped pine boughs that drape gracefully over the lower rounds, giving the tree realistic, plush volume.
Part 4: The Golden Tree-Topper Star & Pearl Ornaments: With Golden Yellow yarn, make a magic ring. Round 1: 5 sc in ring, join with sl st (5 sc). Round 2: *Ch 5, sc in 2nd ch from hook, hdc in next ch, dc in next 2 ch, sk next st on ring, sl st in next st; rep from * 5 times to form 5 crisp star points. Fasten off and sew securely to the top tip of Tree 2. On Tree 1, use a tapestry needle and strong white thread to sew 21 to 24 iridescent pearl buttons randomly across the cone boughs.
3 Maker Secrets for Perfect Stand-Up Cones
1. The Plastic Upcycled Disc Foundation: Cut a 5-inch circle from a flexible plastic lid (such as a yogurt or cottage cheese tub) and place it directly inside the bottom of the base before stuffing. Unlike cardboard, plastic is completely moisture-proof and won’t warp if spot-cleaned.
2. Starch the Golden Star for Razor-Sharp Points: Before sewing the star to the tree apex, lightly mist it with liquid fabric stiffener or hairspray, gently pull each of the five points outwards with pins on a blocking board, and let dry for 30 minutes. The star will stand upright with crisp geometric precision.
3. Fill Firmly from the Apex Down: When stuffing the cone, use small thumb-sized clusters of fiberfill and push them firmly into the tip using the blunt eraser end of a wooden pencil before filling the wider mid-section. This prevents the upper tip from bending or drooping under the weight of the star.
Holiday Mantel Display & Tablescaping

- Rustic Mantel Vignette: Arrange the duo at staggered angles on a wooden fireplace mantel nestled between warm white pillar candles, fresh pine cuttings, and dried orange slices.
- Holiday Dinner Centerpiece: Place the trees along the center of an artisan burlap or linen table runner, surrounded by fairy lights and miniature wooden reindeer for a warm Nordic holiday vibe.
- Hostess & Neighbor Gift Set: Wrap the tree duo in cellophane tied with red velvet ribbon and a handwritten holiday message card for a thoughtful, long-lasting handmade present.
Storage, Washing & Care Guidelines
- Seasonal Storage: Store upright in a clean storage box lined with tissue paper. Do not pack under heavy winter blankets to preserve the crisp ruffled branches.
- Dusting & Refreshing: Use a lint roller or hair dryer on the cool setting to gently blow away dust after unpacking each winter season.
- Spot Cleaning: Dab with a damp microfiber cloth and mild soap if needed. Avoid saturating the cone to keep the interior disc flat.
Frequently Asked Questions
Can I make these trees taller or shorter?
Yes! To adjust the height, simply alter the frequency of your decrease rounds. Decreasing every 3rd round produces a taller, slender pine tree, while decreasing every round results in a short, plump tabletop tree.
Can I weave battery fairy lights into the branches?
Yes! A 3-foot micro LED copper wire light strand can be woven through the shell boughs before sewing the bottom closed, tucking the tiny battery pack securely inside the hollow base.
What if I don’t have pearl buttons?
You can substitute with small 6mm red wood beads, stitched French knots in metallic gold thread, or colorful sequin paillettes for a sparkling retro look.
Pin This Christmas Tree Duo for Later
Love this quick holiday home decor project? Save these Pins to your Christmas crochet and holiday crafts boards on Pinterest so you have the tutorial ready whenever you need it!